Documentation |
Documentation
This documentation refers to an older version of BouncEdit (0.1.31) Iif you would like to help write the new documentation to accompany BouncEdit 1.0, then please contact me.
|

Above you see the main screen. You can select which of the eleven levels Bounce allows you to have from the pull-down list, then you will see the option buttons on the right light up. If 'Custom Level' is greyed out, this means you have not yet saved a custom map at the selected level - you should select the original level and click 'Load Level'.
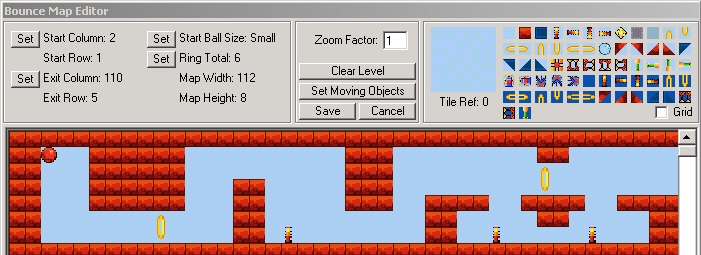
When the level is loaded (this may take some time depending on the speed of your PC) you will see it appear in a window similar to that shown above. You can use the scroll bars to navigate around the map.
Clicking a tile from the selection on the top right makes it 'active' (you will see a large version appear in the box that says 'Tile Ref' underneath it). Clicking on the main map will then lay this tile. Laying a tile of a particular type also associated its action (laying an inflator will make the ball inflate when it touches it, for example).
Rings should be created in pairs - if you only lay 'half rings' I have no idea what will happen.
The exit (where you go to complete the level) should be a set of four tiles in a square. Take a look at some of the existing maps if you don't understand. The tile for the exit is the 9th along from the left on the top row of icons (a grey square).
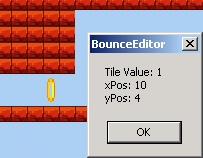
Right clicking on any square of the map brings up a window indicating the Tile Reference (tile value), and the x and y co-ordinates. This is useful when you want to set the start location for your ball, or set moving objects.l
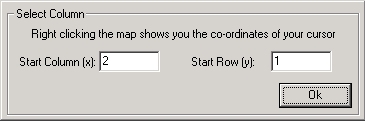
Clicking the 'Set' button next to the Start Column allows you to select the x and y co-ordinates for your ball to start from. You should start the ball in clear air (or perhaps water, I've never tested that).
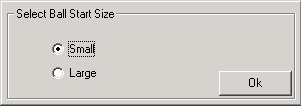
Clicking the 'Set' button next to the Ball Size allows you to select the starting ball size. Remember that large balls can't get through small rings.
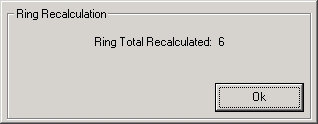
Once you have finished your level design you should click on the 'Set' button next to the Ring Total. This will count the number of rings for you in your map.
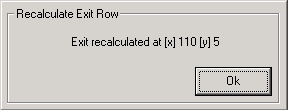
Once your exit has been placed, you should click the 'Set' button to have the application find it.
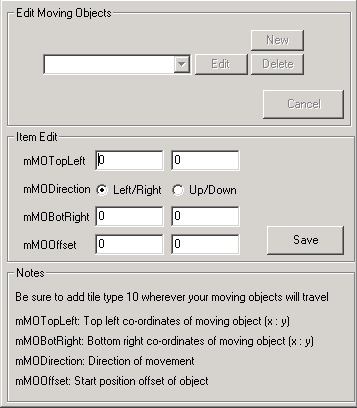
Moving objects are complicated. To begin you need to add 'moving object' tiles to your map for the area in which the object will move. This is the tile next to the exit tile (10th along on the top row).
You then need to select the top left co-ordinate of your object and decide which direction it will move. One of the bottom right co-ordinates will then automatically be filled in for you, you just need to add the other co-ordinate indicating how far it will move to the right, or to the bottom.
The offset value tells the application at what stage in the travels the object should begin when you first encounter it. Newer versions of BouncEdit display the possible values in a panel at the bottom of the window.
If you are confused, the best thing you can do is to look at some of the existing maps you are familiar with and see how their moving objects are coded.
Using the same window, you are also able to edit moving objects, and delete them. Be sure to delete your moving object tiles on the map if you delete an object definition from this window.
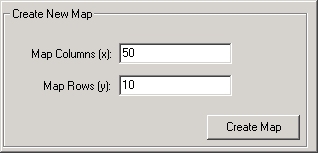
The Create Map window (accessed by clicking 'Clear Level') allows you to breate a totall empty map for your designs. You should be careful to only use multiples of 8 in the level size (8 x 16 or 32 x 128 for example).
You should also take care when designing your levels as the screen can only scroll one full screen up or down at once. If you look at all the pre-existing levels, you will find they are all based on an eight-high design. This can be seen in the picture below.
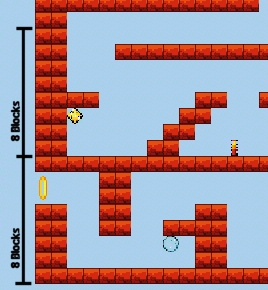
If you don't obey the 'rule of eight', you will find your ball vanishes from the top of the screen, or becomes stuck.
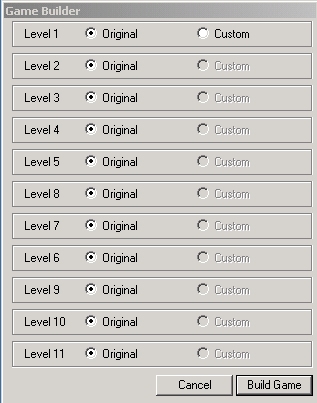
Once you are happy with your level, you are free to test it with either a real phone, or the simulator. Clicking 'Build Game' on the main menu will display a window similar to that shown above. For all levels where you have a custom level, you will have the option to include the original Bounce level, or one of your own creation.
Once you are happy with the mix of old and new levels, you select Build. This assembles the Bounce.jar file, calculates the accompanying Bounce.jad file and saves them to the Game/ directory.
Other Notes
You can only be editing one custom map per level at once. If you wish to have multiple 'Level 1s' for instance then you should edit your map, save the map from ChangedLevels/J2MElvl.0XX (where XX is your level number), and then create a new one. You can then copy the level files back to the ChangedLevels/ folder when you wish to do a build.
Thanks
The graphics
core was partially based on work from Steve MacTaggart.